I believe that you have gone through the first part of this article. i.e,
Our First Android Google Maps API Ver 2.0 Application. Part # 1
In this part we will go through a detail explanation of getting the Api ver 2.0 key one baby step at a time. I ll try not to skip even the smallest step so that fresh developers finds it easy to make it to the finish line successfully. The main sections covered in this article are
- Signing the application and why its necessary.
- Retrieving our application’s certificate.
- Registering our project
- Our Api project creation.
- Obtaining the Api key
- Adding the Api key to our application
Signing the application and why its necessary.
The signing of the application is not something very complicated or suspicious thing. It is used to identify the author of a certain application. Their is no signing authority involved and it is allowed to use self signed certificates for android application. The private key is with the developer of the application. Without signing our application we will not be able to get the Android Google Maps API Ver 2.0 key. So we have to do it as any cost. We will skip a lot of boring theory about this signing application and will go through the important part but if the readers are interested in some more details they can always click on the link “Signing Application Details“. Signing can be in two modes. Signing in Debug mode and Signing in Release mode. In this article I ll only go through the Signing in Debug mode.
Signing in Debug mode
To sign our application in Debug mode first we will make sure that we have the “keytool” utility present at our JDK, JRE install location. The keytool is used to create the debug keystore and key automatically. The key is than used to sign the application automatically. The location of keytool on my system is “C:\Program Files\Java\jre7\bin\keytool.exe”. the debug.keystore is created with predetermined names and passwords. e.g,
- Keystore name: “debug.keystore”
- Keystore password: “android”
- Key alias: “androiddebugkey”
- Key password: “android”
- CN: “CN=Android Debug,O=Android,C=US”
Wc can change the location and name of the debug keystore but for now we will leave it as it is. One thing to make note of is that the self signed certificate of debug mode has a validity of 365 days, than it expires. Now to complete the process we have to retrieve our SHA-1 fingerprint and use it to sign our application and get the api key.
What is SHA-1 fingerprint , where and how to find it.
SHA-1 fingerprint is a unique text string generated by SHA-1 hash Algorithm and as it is unique , Google Maps uses it to identify the application. To find it there are two ways, first use keytool to generate the SHA-1 fingerprint through command prompt. The command is explained in detail in the link How to get Google Maps API Key but there is a simple way to find out SHA-1 fingerprint but before we get this fingerprint we need to understand that there are two type of certificates through which we can generate the SHA-1 fingerprint.
- The Debug Certificate
- The Release Certificate
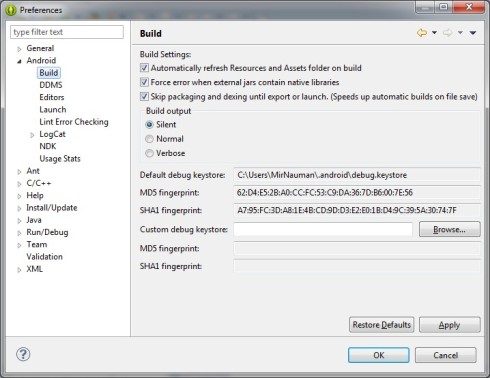
The Debug certificate is created automatically by the SDK tools when the application is built without exporting it as released application. This certificate can only be used for testing and not for publishing the application as released version. The Release certificate is generated by the SDK tools when a release built of the application is done. With this certificate you can the application can be published. For testing and development we will use the Debug certificate. To display the SHA-1 fingerprint on Debug certificate go to Windows menue in Eclipse and click Preferences, than select Android from the list and click Build. We will see the following screen.
This is the easiest way to display the SHA-1 fingerprint. Note down the SHA-1 fingerprint. Keytool commands from command prompt can also be used to display the same SHA-1 fingerprint. But i guess using Eclipse to display this is alot easier.
Registering our application
We will use our gmapv2 application that we have created in Part # 1 of this series for registration process. Open a browser and navigate to the following link. Google API Console.
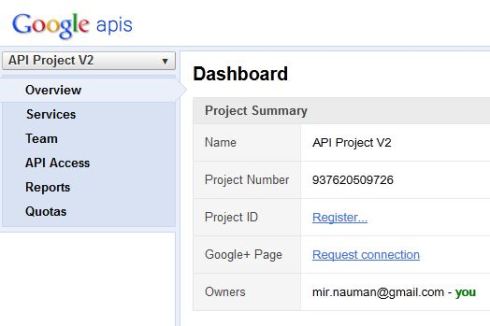
You will be prompted for logging In, Log In with your gmail id and password. You will be taken to the following screen.
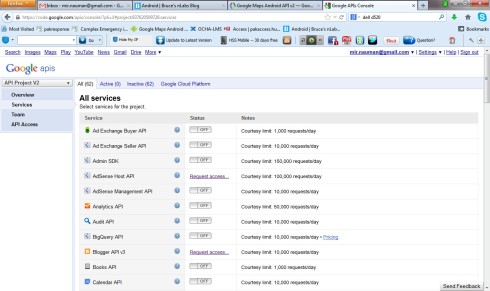
Expand the top Left Dropdown list Where it is written API Project V2 and click Create. A dialog box will appear where will give our new API Project Name, In the above snapshot I have named it API Project V2. Click the Create project button and you will taken the the following screen.
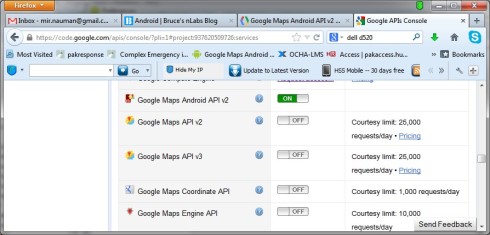
Scroll down in the services and find “Google Maps Android API V 2“. The button in front of it will be showing Off. Click it to turn the service on.
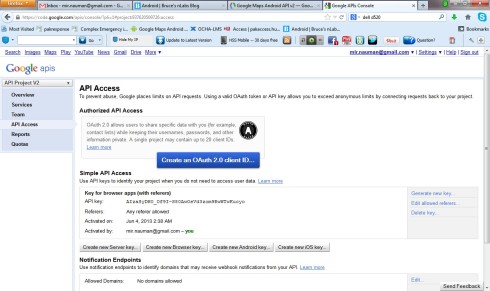
When we turn on the service we will be prompted for Terms of Service. Agree and and click Accept button to proceed. Almost at the finish line to get our API key. Get to the Google API Console. In the navigation bar to the left click API Access.
Obtaining The API Key
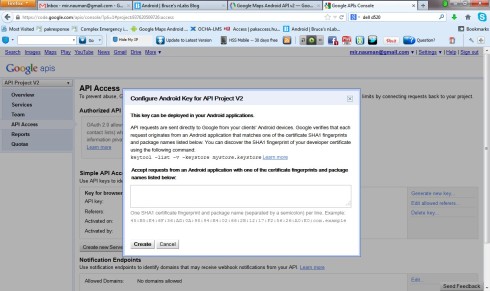
From the above screen click on “Create new Android key” button. This will bring us to the following screen.
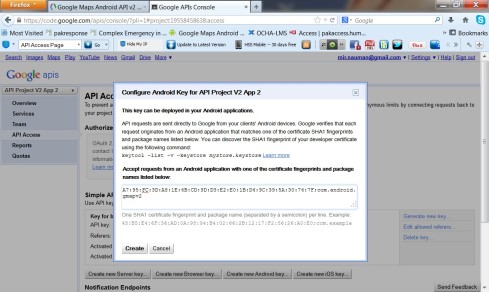
Copy your SHA-1 that we have previously displayed and noted down. Paste that in the empty text box and than enter a “;” semicolon at the end of the string and write your complete package name so the complete string becomes SHA-1 fingerprint+;+complete package name.
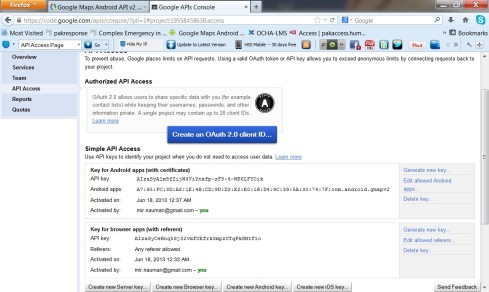
Click create and you will come to the previous screen with the following addition.
As you can see on the screen. Our API Key is listed and below that is the SHA-1+;+complete package name that will be some what like this.
A7:95:FC:3D:A8:1E:4B:CD:9D:D3:E2:E0:1B:D4:9C:39:5A:30:74:7F;com.android.gmapv2
The API Key will look like this.
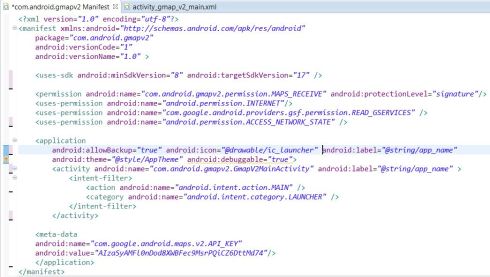
Adding the key to our gmapv2 application Open the gmapv2 application in Eclipse. Open the AndroidManifest.xml file and write the following code with your own API Key. Just above the application ending tag.
Now add the necessary permissions to AndroidManifest.xml file.
Setting up permissions in AndroidManifest.xml file for our first Android Google Maps API Ver 2.0 Application
Code of the complete AndroidManifest.xml file will look like this.
So far we are done with getting the API Key and putting it in our gmapv2 application. In the next part of this series we will go through all the steps of how to deploy or test this application on actual device. How actual device can be connected to Eclipse. What challenges we will face and what are the solutions for that.
Related articles
- Our First Android Google Maps API Ver 2.0 Application. Part # 1 (mirnauman.wordpress.com)
- How to get Google Maps API Key
Note : Source code for this article
https://docs.google.com/file/d/0B7W5NGdltb1jeXBvRDNqaV9maFk/edit?usp=sharing


1 comment
Comments feed for this article
January 30, 2014 at 12:01 pm
Testing and deploying applications on Physical Device. Our First Android Google Maps API Ver 2.0 Application. Testing Google Maps Api Ver 2.0 Application on Physical Device. Part # 3 | Mir
[…] https://mirnauman.wordpress.com/2013/06/18/our-first-android-google-maps-api-ver-2-0-application-gett… […]