This is in continuation to the first two articles of Android Google Maps Api Ver 2.0.

https://mirnauman.wordpress.com/2013/06/11/our-first-android-google-maps-api-ver-2-0-application-part-1/

https://mirnauman.wordpress.com/2013/06/18/our-first-android-google-maps-api-ver-2-0-application-getting-the-android-google-maps-api-ver-2-0-key-part-2/

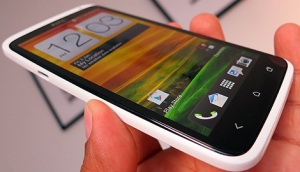
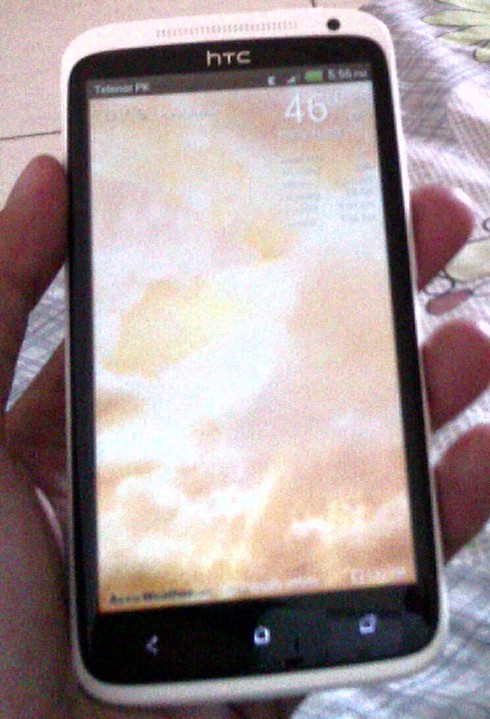
The objective of this article is to test our Google Maps Api Ver 2.0 Application that we have developed so far in the first two parts of this series of articles on a Physical Device. We need a physical Android device. The one that I have is HTC One X.

HTC-ONE-X

HTC-ONE-X

Identifying which  Android USB drivers to use

Before we start to install the drivers we need to identify which drivers are we going to install.If we have an Android Developer Phone (ADP) like Nexus we will use the Google USB Drivers.  The latest Google USB Drivers can be downloaded using the following link. http://developer.android.com/sdk/win-usb.html and help on how to install it . Only the Galaxy Nexus drivers are provided by Samsung and not Google. We can get the drivers for Galaxy Nexus from the following link. http://www.samsung.com/us/support/downloads/verizon-wireless/SCH-I515MSAVZW . If we have a device other then the above mentioned, we will use OEM Drivers. I own an HTC ONE X so in this article we will go the the OEM Drivers.

Installing the Android USB Drivers

Now that we have identified which device do we have and which drivers we will install. In my case I ll install the OEM drivers for HTC ONE X. The link shows a list of devices and their links from where their USB drivers can be downloaded.  http://developer.android.com/tools/extras/oem-usb.html . So we will go to the HTC page and will click on support to get the drivers. HTC Sync Manager will do the job.  When the appropriate drivers are installed on the computer than  we will move to the next phase.

Setting up Eclipse for our Physical Device

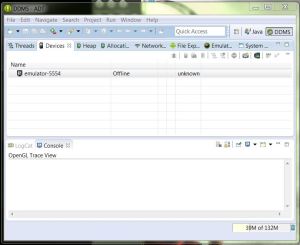
Run Eclipse,  open the DDMS tab. If our emulator is running we will only see the emulator in DDMS. We wont see Physical Device in DDMS.

DDMS not showing the Physical Device

DDMS not showing the Physical Device

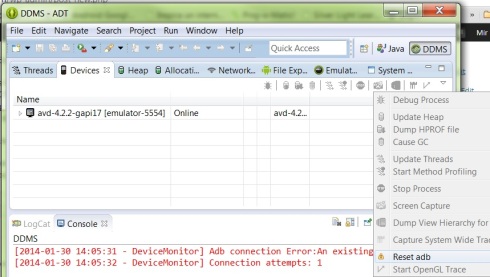
Enable the USB debugging from the device. Then in DDMS select the Devices Tab and click on the right most arrow to get the drop down menu , click on Rest adb.

Resetting the adb.

Resetting the adb.

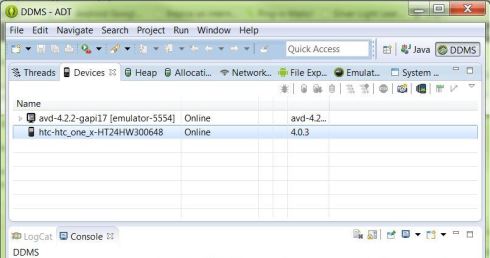
When we Reset the adb, the DDMS will show our Physical Device in the Devices Tab. If not make sure that the device is properly connect to the computer with the USB connecting cable.  This is what you will see when everything goes fine.

DDMS showing our Physical Device in the Devices Tab.

DDMS showing our Physical Device in the Devices Tab.

Deploying our application on the Physical device.

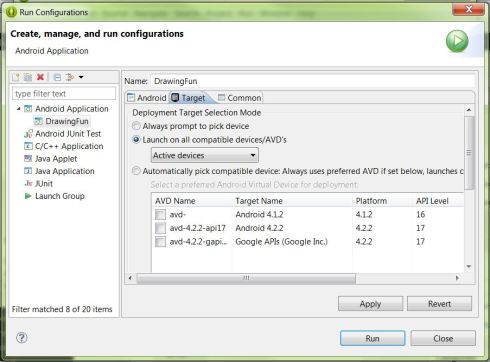
Close all the Emulators, Make sure the Device is connected properly with the computer. In DDMS check in the Devices Tab if its still showing our Physical Device, if it is than its ok, if not then Reset adb as explained earlier. After having the Physical Device in the DDMS go to Run Configuration Screen from where we normally select the AVD or emulator to Run our application. The image below shows the screen.

Deploying our Applicaiton on device.

Deploying our Applicaiton on device.

In the Target Tab click on the dropdown menu, it has three options

  1. Active AVD’s/Active Devices
  2. Active AVD’s
  3. Active Devices

Select the 3rd option, “Active devices” Then Click Apply and Run. If the device is properly connected, and it appears in the DDMS, the system will automatically search for active devices. In our case HTC One X is the active device. The application will be directly deployed on our Device.  When we make some changes to the code, we can deploy the application directly to the device exactly the same way again, but its better to un install the last deployed application and then deploy a fresh copy of our application again on the device from Eclipse.

Note:- This article is not specific for deploying just Google maps applications on Physical Devices. Any application can be deployed on Physical Device using the steps in this article. Secondly , earlier it was not possible to run Android Google Maps APi ver 2.0 on AVD or emulator so we had to test the application on Physical Device. But now its not necessary , now we can test our Android Google Maps API Ver 2.0  applications on emulators or AVDs.

Thats all for now, I ll come up with testing and deployment on emulator soon

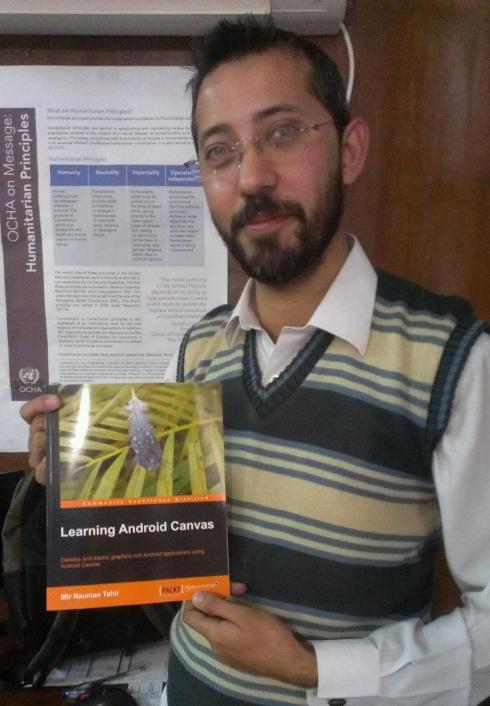
Learning Android Canvas

My First Book
My First Book

I was away from my blog for a few months and the reason was this book. It was a challenging task and a lot different then writing my usual technical articles.  On 10th Dec 2013 I received the first printed version of my book. I really don’t have words to explain my feeling when I opened the package and saw my name on the Title of the book.

For Details follow the link https://mirnauman.wordpress.com/my-first-book/

I believe that you have gone through the first part of this article. i.e,

Our First Android Google Maps API Ver 2.0 Application. Part # 1

In this part we will go through a detail explanation of getting the Api ver 2.0 key one baby step at a time. I ll try not to skip even the smallest step so that fresh developers finds it easy to make it to the finish line successfully. The main sections covered in this article are

  • Signing the application and why its necessary.
  • Retrieving our application’s certificate.
  • Registering our project
  • Our Api project creation.
  • Obtaining the Api key
  • Adding the Api key to our application

Signing the application and why its necessary.

The signing of the application is not something very complicated or suspicious thing. It is used to identify the author of a certain application. Their is no signing authority involved and it is allowed to use self signed certificates for android application. The private key is with the developer of the application. Without signing our application we will not be able to  get the Android Google Maps API Ver 2.0 key. So we have to do it as any cost.  We will skip a lot of boring theory about this signing application and will go through the important part but if the readers are interested in some more details they can always click on the link “Signing Application Details“. Signing can be in two modes. Signing in Debug mode and Signing in Release mode. In this article I ll only go through the Signing in Debug mode.

Signing in Debug mode

To sign our application in Debug mode first we will make sure that we have the “keytool” utility present at our JDK, JRE install location. The keytool is used to create the debug keystore and key automatically. The key is than used to sign the application automatically. The location of keytool on my system is  “C:\Program Files\Java\jre7\bin\keytool.exe”. the debug.keystore is created with predetermined names and passwords. e.g,

  • Keystore name: “debug.keystore”
  • Keystore password: “android”
  • Key alias: “androiddebugkey”
  • Key password: “android”
  • CN: “CN=Android Debug,O=Android,C=US”

Wc can change the location and name of the debug keystore but for now we will leave it as it is. One thing to make note of is that the self signed certificate of debug mode has a validity of 365 days, than it expires. Now to complete the process we have to retrieve our SHA-1 fingerprint and use it to sign our application and get the api key.

What is SHA-1 fingerprint , where and how to find it.

SHA-1 fingerprint is a unique text string generated by SHA-1 hash Algorithm and as it is unique , Google Maps uses it to  identify the application. To find it there are two ways, first use keytool to generate the SHA-1 fingerprint through command prompt. The command is explained in detail in the  link How to get Google Maps API Key but there is a simple way to find out SHA-1 fingerprint but before we get this fingerprint we need to understand that there are two type of certificates through which we can generate the SHA-1 fingerprint.

  1. The Debug Certificate
  2. The Release Certificate

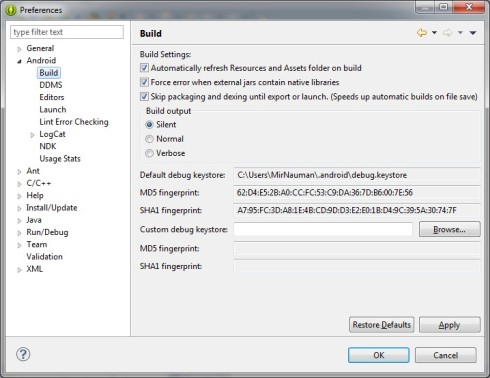
The Debug certificate is created automatically by the SDK tools when the application is built without exporting it as released application. This certificate can only be used for testing and not for publishing the application as released version. The Release certificate is generated by the SDK tools when a release built of the application is done. With this certificate you can the application can be published. For testing and development we will use the Debug certificate. To display the SHA-1 fingerprint on Debug certificate go to Windows menue in Eclipse and click Preferences, than select Android from the list and click Build. We will see the following screen.

Debug keystore and SHA-1 Fingerprint

Debug keystore and SHA-1 Fingerprint

This is the easiest way to display the SHA-1 fingerprint. Note down the SHA-1 fingerprint. Keytool commands from command prompt can also be used to display the same SHA-1 fingerprint. But i guess using Eclipse to display this is alot easier.

Registering our application

We will use our gmapv2 application that we have created in Part # 1 of this series for registration process. Open a browser and navigate to the following link. Google API Console.

You will be prompted for logging In, Log In with your gmail id and password. You will be taken to the following screen.

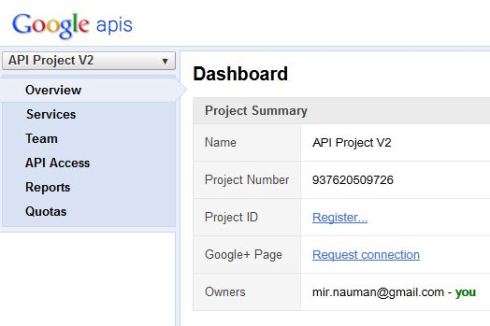
Google API Console Main Page

Google API Console Main Page

Expand the top Left Dropdown list Where it is written API Project V2 and click Create. A dialog box will appear where will give our new API Project Name, In the above snapshot I have named it API Project V2. Click the Create project button and you will taken the the following screen.

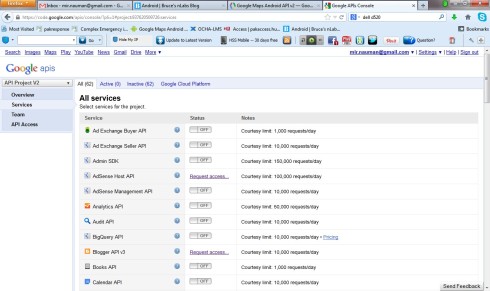
The services tab in the google api console

The services tab in the google api console

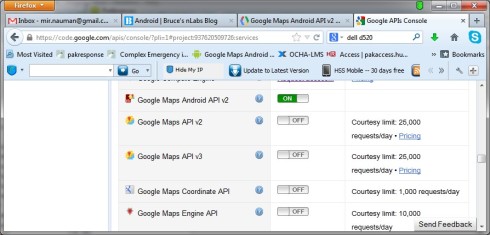
Scroll down in the services and find “Google Maps Android API V 2“. The button in front of it will be showing Off. Click it to turn the service on.

Turning the Google Maps Android API v2  service on

Turning the Google Maps Android API v2 service on

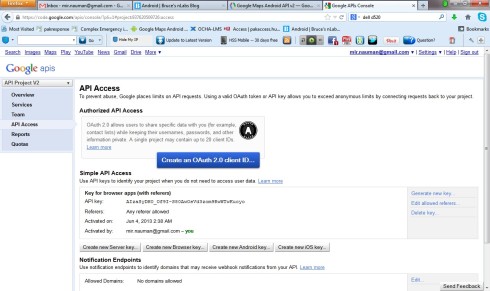
When we turn on the service we will be prompted for Terms of Service. Agree and and click Accept button to proceed. Almost at the finish line to get our API key. Get to the Google API Console. In the navigation bar to the left click API Access.

Obtaining The API Key

API Access Page

API Access Page

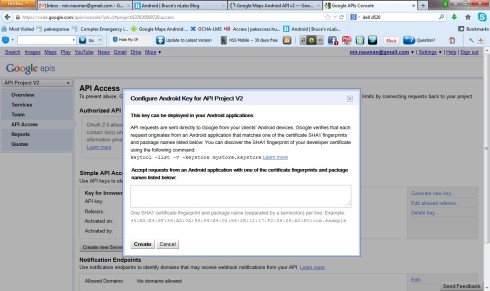
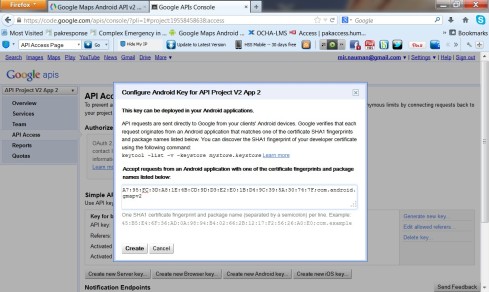
From the above screen click on “Create new Android key” button. This will bring us to the following screen.

Configure Android Key for our project

Configure Android Key for our project

Copy your SHA-1 that we have previously displayed and noted down. Paste that in the empty text box and than enter a “;” semicolon at the end of the string and write your complete package name so the complete string becomes SHA-1 fingerprint+;+complete package name.

Key Generation

Key Generation

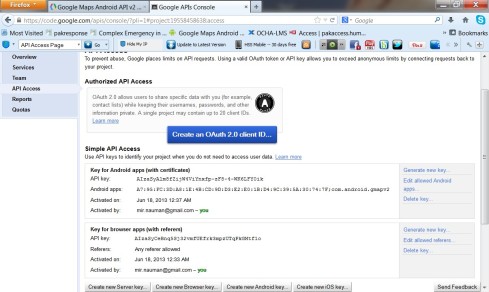
Click create and you will come to the previous screen with the following addition.

Our Google Maps Android API Ver 2.0 Key and Fingerprint with package name

Our Google Maps Android API Ver 2.0 Key and Fingerprint with package name

As you can see on the screen. Our API Key is listed and below that is the SHA-1+;+complete package name that will be some what like this.

A7:95:FC:3D:A8:1E:4B:CD:9D:D3:E2:E0:1B:D4:9C:39:5A:30:74:7F;com.android.gmapv2

The API Key will look like this.

AIzaSyAlm8fZijW4ViYnxfp-zF8-4-WK6LFY0ik
Copy the key and move on.

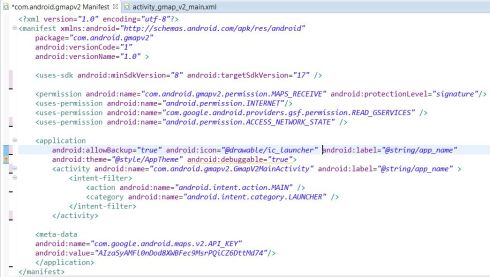
Adding the key to our gmapv2 application Open the gmapv2 application in Eclipse. Open the AndroidManifest.xml file and write the following code with your own API Key. Just above the application ending tag.

Putting the API Key in AndroidManifest.xml file

Putting the API Key in AndroidManifest.xml file

Now add the necessary permissions to AndroidManifest.xml file.

Setting up permissions in AndroidManifest.xml file for our first Android Google Maps API Ver 2.0 Application

Setting up permissions in AndroidManifest.xml file for our first Android Google Maps API Ver 2.0 Application

Code of the complete AndroidManifest.xml file will look like this.

Complete code of AndroidManifest.xml

Complete code of AndroidManifest.xml

So far we are done with getting the API Key and putting it in our gmapv2 application. In the next part of this series we will go through all the steps of how to deploy or test this application on actual device. How actual device can be connected to Eclipse. What challenges we will face and what are the solutions for that.

Note : Source code for this article

https://docs.google.com/file/d/0B7W5NGdltb1jeXBvRDNqaV9maFk/edit?usp=sharing

Today when i came to office, turned on my computer and logged In. With a cup of tea and going through my unread emails one by one i logged In to my skype as we use that for most of our official meeting with the head office team. The first thing that got my attention was

Wat am I up to

Wat am I up to

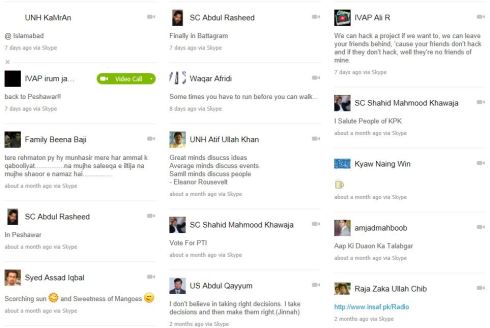
I started thinking what am i up to. I was waiting for a meeting to start at 10, but do i really have to tell this to my friends. Than i started thinking what am i really up to and my mind was blank. suddenly i thought lets see what are my friends up to and what can i make up from what they are telling me . Here is a snap shot of what my friends are up to

What are my friends up to

What are my friends up to

Now i write what came to my mind when I was going through each one of their up-to-messages. Will only go for some highlights.

  • Kamran is at Islamabad and he is always at Islamabad, wonder when he will be in some other city, He needs some change and outing.
  • Abdul Rasheed is finally In Battagram as MIS Coordinator, Enjoying my last position. Congratz Rasheed and best of luck for your new position and assignments. I hope u can handle the team their.
  • Ali is some hacking thingi and trying to convince me that i should leave my friends behind as they dont have the qualifying skill set for the gang or at least that wat i can make out of it. 🙂
  • Irum is back to peshawar and was with us in the meeting that i have just attended. I still didnt get from where we started and wat we actually decided in that meeting to do next. will check the minutes of the meeting later.
  • Waqar is always on the run, infact he was the kind of child who never crawled or walked, The day his feet touched the gournd for the first time, he started running like Road Runner of looney toons.
    Wile E. Coyote and Road Runner

    Wile E. Coyote and Road Runner (Photo credit: Wikipedia)


  • Shahid Mahmood is still voting for IMRAN KHAN.
    English: Imran Khan, December 2007

    English: Imran Khan, December 2007 (Photo credit: Wikipedia)

    even the elections are history , with half of IK votes gone to trash by Election Fixers.

  • Atif sab has quoted something nice that shows that i fall in the third category, am discussing people.
  • Kyaw is having cofee with his family back home. On his RnR.
    Cofee Time

    Cofee Time (Photo credit: CK | PHOTOGRAPHER)


  • Amjad Mahboob qureshi needs our prayers for his upcoming challenges.
  • Asad is enjoying mangoes in hot sun. Bro you need to send some for me.
  • Abdul Qayum is back from US, now that he has taken the decision he has to make it right. And i wonder if i am so much concerned about REEMA stealing his idea, what will be his feelings about that. REEMA started REEMA KA AMERICA
    reema ka america. a copy paste idea

    reema ka america. a copy paste idea

    after he had worked for a few months on ABDUL KA AMERICA.

    abdul ka america. the actual idea

    abdul ka america. the actual idea

    The point is who will watch or read abdul ka america if reema ka america is on air.

  • Achoka luduba is a simple man, he is marketing that.
  • Oh Waqar agian, and this time he is trying to make us believe that afridi’s are not gangsters. Wat about the zillion warships that u have prepared to attack on me bro.
  • Ashfaq ahmed is a proud Pathan and I am the same thing too. But wud like to call my self a proud Pakistani, than a proud Pathan.
  • Lubna status is a blank line, guess her mind is as blank as mine. thinking where to start my day.
  • and the list goes on and on but i guess i have to stop here.

Note:- To all my friends specially those who’s names are listed in the above post. No offense dears. I wrote this just for fun. If some one finds it offensive , Please let me know, I ll remove his part.

Have a nice working day. 🙂

Update 1.0 of this article at the bottom of the page.

Driving agent for this article

There was some stuff that my readers were eagerly waiting for. With the launch of Android Google Maps API Ver 2.0 everything that was in progress with API Ver 1.0 was a mess. The switching had given a hard time to alot of developers as the way even the sample app is successfully executed is way too complicated. I received tons of emails and requests for support specially for getting the Google Maps API Ver 2.0 key and the part where everything seems fine but map is not displayed. A couple of days back i started working on Google Maps API Ver 2.0. I solved the above two issues and alot more but didn’t posted anything because i was in the middle of successfully executing and displaying the Map. The aim was that I’ll start writing once am done with at lease one successful running application and today i have that running app. During this series of articles i ll take my readers from basic setup and configuration to a successful run of their first Android Google Maps  API Ver 2.0 Application.

Before we start I need my readers to keep this in  mind that they need a physical device to develop and test their API Ver 2.0 Application. I am using HTC One X as my physical device

HTC-One-X

HTC-One-X


What we have and what we need

I believe that we have Eclipse installed,  JRE installed and in place as without JRE Eclipse won’t work and Android SDK downloaded and installed, if not Google has made it easy for us with a single download. Download the ADT Bundle for the following link http://developer.android.com/sdk/index.html . The ADT (Android Developer Tools) Includes Eclipse with ADT PlugIn, Android SDK Tools, Android Platform Tools and the latest Android Image for the emulator. You might need to download the JRE and install it to run the IDE. We need the following to get rolling.

  • Physical Device ( I have an HTC One X)
  • Google Play Services
  • Android Support Library
  • An API Ver 2.0 Key
  • OEM USB Drivers (For windows, as am using Windows 7 Professional 64bit)

In part 1 we will only get all these bits and pieces together so that we can make it work in the later sections bit by bit and piece by piece. Lets say we have the Physical Device so we will move to the next thing in the list i.e, Google Play Services. But before we do that we need to start a new project with the name gmapv2 with Android 4.2.2 and Google API Lever 17. (I hope the reader has some background of basic android development.)

Installing Google Play Services

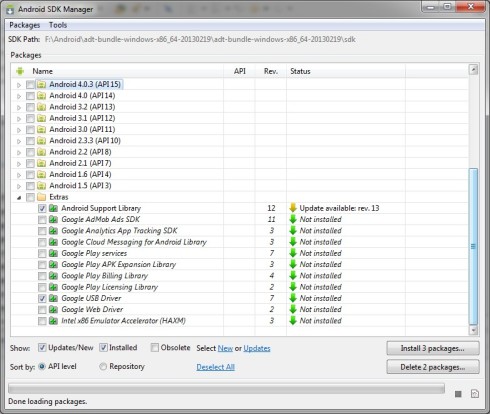
To get the Google Play Services Launch the SDK Manager from within Eclipse. Click Windows>Android SDK Manager. Scroll down the list and mark Google Play Services.  Click the “Install Packages” button and wait till the installation is completed.

Installing Google Play Services

Installing Google Play Services

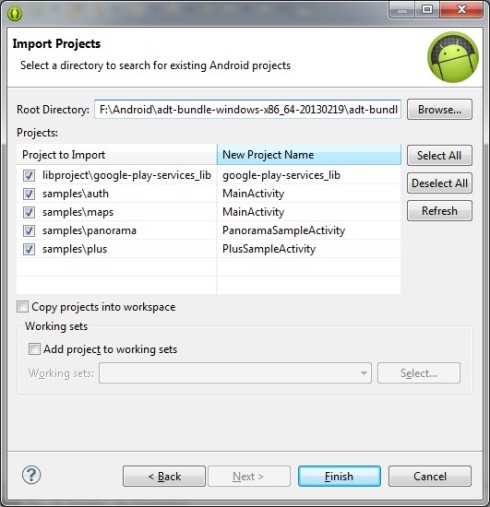
When the Installation is done, we will add to our project. The easiest way is Right Click on the project and click on Import>Android>Existing Android Code Into Workspace . Browse to the location of the library project.

Importing Google Play Services

Importing Google Play Services

The location of my library project is

F:\Android\adt-bundle-windows-x86_64-20130219\adt-bundle-windows-x86_64-20130219\sdk\extras\google\google_play_services\libproject\google-play-services_lib

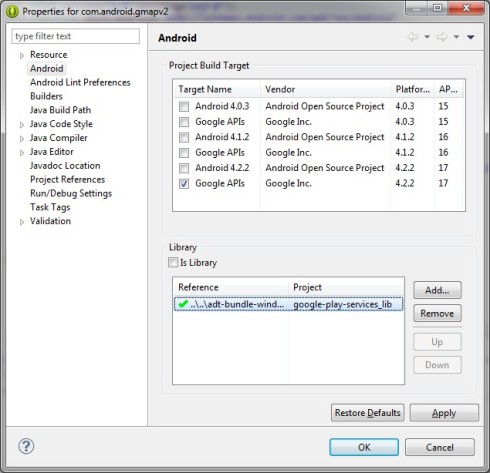
We have to take care when doing this. we have to go to the google-play-services_lib inside libproject that is inside the google-play-services folder. When the import is done successful. Now we have to add a reference to our project.

Reference to Google Play Services

Right click on our project and click on Properties. From the list click on Android. Click Add, browse to the google-play-service_lib.

Reference to Google Play Services

Reference to Google Play Services

Now that we are done with Google Play Services, we will come to Google Support Library.

Android Support Library

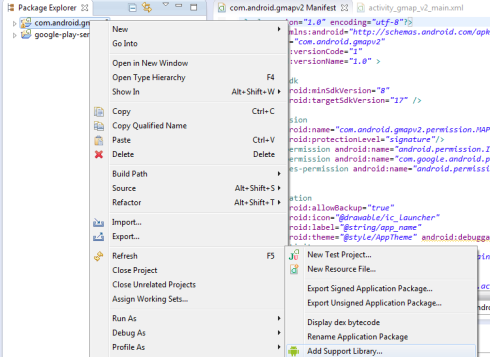
To add the Google Support Library , right click on the project and click on Android tools. Than click on Add Support Library.

Adding Android Support Library

Adding Android Support Library

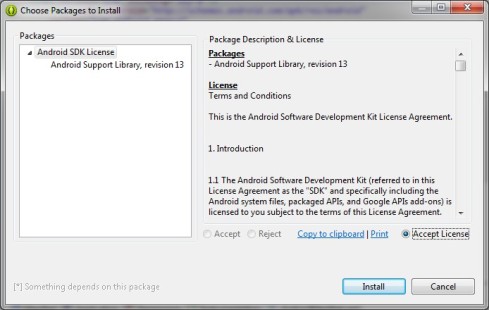
Accept the license agreement and install the support library.

Installing Support Library

Installing Support Library

Save your project and we are done with part 1st of this tutorial. In Part 2 we will learn step by step how we will get Google Maps API Ver 2.0 Key. Getting the API key is the most tricky part.

For Android Google Maps Ver 1.0 developers should click on the following link

Android Google Maps Tutorial Part 1. Basic Development.

Note : Source code for this article

https://docs.google.com/file/d/0B7W5NGdltb1jeXBvRDNqaV9maFk/edit?usp=sharing

Update 1.0 (30th JAN 2014):- Before it was not possible to test an Android Google Maps Api Ver 2.0 on Emulator but now its possible. I ll post both the articles soon . Testing the App on physical device and Testing the App on emulator.

The WordPress.com stats helper monkeys prepared a 2012 annual report for this blog.

Here’s an excerpt:

19,000 people fit into the new Barclays Center to see Jay-Z perform. This blog was viewed about 120,000 times in 2012. If it were a concert at the Barclays Center, it would take about 6 sold-out performances for that many people to see it.

Click here to see the complete report.

There are tons of articles on the internet that demonstrates how to call a web service from android code. I ll try to keep it simple so that my reader don’t get confused as i was while reading others articles on the current topic. Object of this article is a  simple application that takes text from an Android Activity, than calls a web service, pass the values to the web service, than the web service do what ever it likes to do with the received text and that’s it. When we are done with this scenario than we will make this application more complicated by receiving something from a web service as a response and do something inside our application.

I ll assume that we have a web service developed and deployed for this purpose. For this tutorial we will use the web service that i have previously developed which receives two numbers and returns their sum.  https://mirnauman.wordpress.com/2012/08/08/creating-a-simple-dot-net-web-service/

Start with a simple application. Than download the latest KSoap2 jar files from the following address.

http://code.google.com/p/ksoap2-android/downloads/detail?name=ksoap2-android-assembly-2.4-jar-with-dependencies.jar&can=2&q=

or you can search the KSoap2 library and download it from any other location. The thing to remember is that what ever is downloaded it should be ksoap2-android-something and not just ksoap2-something.  When the jar file is downloaded. Add the jar file to the existing project. Steps are given below.

  1. Right click the project and click Properties.
  2. From the opened dialog click on Java Build Path
  3. Open the Libraries Tab
  4. Click on the Add External JARs button to the right.
  5. Select the ksoap2-android-something.jar file from the HDD and click ok.

Ksoap2 jar file addition to the application

This will add the library to the current application. now coming to some coding thingi. Add the following in the import section


import org.ksoap2.SoapEnvelope;
import org.ksoap2.serialization.PropertyInfo;
import org.ksoap2.serialization.SoapObject;
import org.ksoap2.serialization.SoapPrimitive;
import org.ksoap2.serialization.SoapSerializationEnvelope;
import org.ksoap2.transport.HttpTransportSE;

Application that calls a web service and and sends two numbers

Add the following code to the start of our Main Activity code, outside the onCreate() method in the section where we define our global variables.

private final String SOAP_NAMESPACE = "http://tempuri.org/";
private final String SOAP_URL = "http://10.52.0.114:8082/Service1.asmx";

private final String SOAP_ACTION = "http://tempuri.org/add";

private final String SOAP_METHOD_NAME = "add";
 private SoapObject request;
 private PropertyInfo pi1;

private PropertyInfo pi2;

In the above section we have created variables with values providing the Namespace, the URL where our web service is hosted, the action consisting our WEB METHOD in our web service and the method name that will be called. Other than that we have created two objects of type SoapObject and PropertyInfo.


//webservice thingi start

request = new SoapObject(SOAP_NAMESPACE, SOAP_METHOD_NAME);

pi1 = new PropertyInfo();
 pi1.setName("a");
 pi1.setValue(etno1.getText().toString());//get the string that is to be sent to the web service
 pi1.setType(String.class);
request.addProperty(pi1);

pi2 = new PropertyInfo();
 pi2.setName("b");
 pi2.setValue(etno2.getText().toString());//get the string that is to be sent to the web service
 pi2.setType(String.class);
request.addProperty(pi2);

SoapSerializationEnvelope envp = new SoapSerializationEnvelope(SoapEnvelope.VER11);
 envp.dotNet = true;
 envp.setOutputSoapObject(request);
 HttpTransportSE androidHttpTransport = new HttpTransportSE(SOAP_URL);
 try {
 androidHttpTransport.call(SOAP_ACTION, envp);
response = (SoapPrimitive)envp.getResponse();
 } catch (Exception e) {
Log.i("WS Error->",e.toString());
 }
 //webservice thingi ends

In the above code we define a request object, than we define a Property Info object, set a name for it. Assign a value to it. Set its type and add that property to the already created request object.  After that “androidHttpTransport.call(SOAP_ACTION, envp);” this is the actual statement that actually calls the web service and passes the values to it. If everything is fine, the program will execute smoothly else the program will crash here.

Issues that am unable to solve so far.

There are a number of possibilities that can cause the application to crash at this point. “response = (SoapPrimitive)envp.getResponse();” this will get the response from the web service if the web service is actually returning some value. So far am trying to tune this part. As the response is not giving me the desired returned value. Either it returns a zero, if i switch between SoapPrimitive and SoapObject than either the program crashes or returns the value the i pass first to the web service.

Note:- KSOAP2 might not be a good option if this return value issue is not solved but if we are working with a web service that only receives a value from our Android application and do something of its own like saving the received string in the database on some server, than KSOAP2 can be used as explained in the above tutorial.

This article is in continuation of the previous one in which we have created a simple dot net web service.  https://mirnauman.wordpress.com/2012/08/08/creating-a-simple-dot-net-web-service/

First of all click on Build and than on Publish.

Publishing Our Web Service

On the next screen provide setting for the publishing. Like enter a publish profile name. Keep publish method to File System. Specify a Target Location where the published files will be saved.

Publishing Settings


Now open Internet Information Services Manager. We can do this by typing inetmgr in RUN dialog or Administrative Tools from Control Pannel. When the IIS Manager is open. Right Click the server name and click add Website.

IIS Configuration for hosting our web service. Add a new site to the application pool.

This will open the add website dialog. Enter a site name, application pool name, provide the Physical path of the published files of our web service and provide a port number like 8082 etc.

Add website settings

Now check the application pool.

Website created in IIS application pool

Right click on the website in IIS Manager and click Browse Website. you will see your web service up and running.

Note:- this tutorial can  be used to publish any website or web service. The steps are the same

Motive

The reason for writing this article is that a lot of people have published too many articles on creating web services and making it simple but non is actually simple.  Almost all of those article focus on the boring theory and functionality  of the web service and not on actually what we least require to create a simple web service. Beginners to web services like me get confused in the functionality and un necessary theory. With this confusion the actual cause of creating a very simple web service dies. I have made it very simple to create a .net web service and my readers can extend this article like instead of addition they can put in what ever functionality they want in the WebMethod to get this web service work for them according to their needs.

Some Boring Theory That We Can’t Get Rid Off

  • When ever we create a web service we need some part of it to be accessed from outside. So that we can call it and make it do something for us. to make a method accessible to the outside world we need to add [WebMethod] Attribute on top of that method.
  • The method that we need to expose to the outside world must be public.
  • The file that we need to call is the one with “.asmx” extension to execute our web service.
  • We can have a private method in our web service that can be called from with in our public method. Like we can have some classes that will have some method that will do some stuff for us. To get access to that functionality of those method. We need to call those methods from our public method by creating objects of those classes in the Service1.asmx file and calling those methods through those objects.

Now Coming To The Real Stuff.

My development environment

  • Visual Studio 2010
  • Windows 7 professional 64 bit
  • Dot net framework 3.5

Creating the Web Service

Open your Visual Studio and click New Project (Section 1 in image).  From the left side panel choose C#(Section 2 in image) , Web(Section 3 in image). From the Framework selection dropdown at the top select .Net Framework 3.5 (Section 4 in image) and from the list below that select ASP.Net Web Service Application (Section 5 in image). Give the name of the web service application (Section 6 in image)  and the location (Section 7 in image) where it will be saved.  Click OK  (Section 8 in image)to create the project.

Creating a simple .net 3.5 web service application


namespace WsMirTestWebService
{
 /// <summary>
 /// Summary description for Service1
 /// </summary>
 [WebService(Namespace = "http://tempuri.org/")]
 [WebServiceBinding(ConformsTo = WsiProfiles.BasicProfile1_1)]
 [System.ComponentModel.ToolboxItem(false)]
 // To allow this Web Service to be called from script, using ASP.NET AJAX, uncomment the following line.
 // [System.Web.Script.Services.ScriptService]
 public class Service1 : System.Web.Services.WebService
 {
 [WebMethod]
 public string HelloWorld()
 {
  return "Hello World";
 }
 }
}

This is what is created for us by default. now replace the method

[WebMethod]
public string HelloWorld()
 {
  return "Hello World";
 }

with your own method that you want to call from outside. Lets say we want to send two numbers to the web service and get the sum

[WebMethod]
 public int add(int a,int b)
 {
  int c = 0;
  c = a+b;
  return c;
 }

Testing Created Web Service

Now when we run our web service, we will see Service1.asmx in brower with all our WebMethods. Currently we have only one method i.e, add.

Running our web service. Service1.asmx is displayed in browser with our WebMethod “add” on display

Clicking on the add link will take us to the second screen where we will supply two values to our WebMethod and will click the Invoke button to execute the add method.

WebMethod add executed. The method expects two values, a and b.

We provide two values 7,3 and click Invoke button. This will execute our WebMethod add and if our method is returning some value it will show us the returned value.

Returned Value of our WebMethod add.


https://mirnauman.wordpress.com/2012/08/15/publishing-a-dot-net-web-service-or-website/

The above link can be used to publish the created web service.

Preface:

One of readers asked me to write about getting the names of the location that I touch on the map if it is possible to get names from coordinates. That query triggered me to write this article. The answer is yes we can get location names if we have coordinates, the process is called Geocoding.

Geocoding is the process in which we translate latitude and longitude sets to text based address or string location names. Like if we have the coordinates 33695043,73050000 and we want to know which location is it. We will use geocoding and will find out that its Islamabad, the capital of Pakistan. Same is the case with Reverse Geocoding, if we have the name Islamabad, we can Reverse Geocode it to fine the coordinates. To continue with this article I have used the code from my last tutorial i.e, https://mirnauman.wordpress.com/2012/04/26/android-google-maps-tutorial-part-7-drawing-a-path-or-line-between-two-locations/ but u guys don’t need to use the code from that tutorial. You can use ur current google maps app and just insert the OnTouchEvent method the YourOverlay Class that extends Overlay Class

A lil boring theory:

We will use the Geocoder Class. This class is used for Geocoding and Reverse Geocoding. Now in Reverse Geocoding things can be a lil tricky coz the returned latitude, longitude values depend on the string address details that a user has provided. It may be just a city name, a city name with a street name or a city name with street name and name of a building or specific location. The Geocoder class requires a backend service that is not included in the core android framework. The Geocoder query methods will return an empty list if there no backend service in the platform. The major public methods of this class are getFromLocation() and getFromLocationName(). The earlier one will transform lat,long values to string location names and the later one will get the coordinates from string location names. both the methods will return an array of address i.e, List< Addresses >.

Enough theory, now some real stuff

Add the following code to the class that extends Overlay Class


@Override
 public boolean onTouchEvent(MotionEvent event, MapView mapView)
 {
 //---when user lifts his finger---
 if (event.getAction() == 1) {
 GeoPoint p = mapView.getProjection().fromPixels(
 (int) event.getX(),
 (int) event.getY());

 Toast.makeText(getBaseContext(),
 p.getLatitudeE6() / 1E6 + "," +
 p.getLongitudeE6() /1E6 ,
 Toast.LENGTH_SHORT).show();

 Geocoder geoCoder = new Geocoder(getBaseContext(), Locale.getDefault());
 try {
 List<Address> addresses = geoCoder.getFromLocation(p.getLatitudeE6() / 1E6, p.getLongitudeE6() / 1E6, 1);

 String strCompleteAddress= "";
 if (addresses.size() > 0)
 {
 for (int i=0; i<addresses.get(0).getMaxAddressLineIndex();i++)
strCompleteAddress+= addresses.get(0).getAddressLine(i) + "\n";
 }
 Log.i("MyLocTAG => ", strCompleteAddress);
 Toast.makeText(getBaseContext(), strCompleteAddress, Toast.LENGTH_LONG).show();
 }
 catch (IOException e) {
 Log.i("MyLocTAG => ", "this is the exception part");
 e.printStackTrace();
 }
 return true;
 }
 else
 return false;
 }

The first Toast will show only the latitude and longitude in number for the location that is touched. Then we created an object of the Geocoder class.


Geocoder geoCoder = new Geocoder(getBaseContext(), Locale.getDefault());

Than we called the getFromLocation method, provided it with the latitude and longitude values and the number of search results that will be returned.


List<Address> addresses = geoCoder.getFromLocation(p.getLatitudeE6()  / 1E6,  p.getLongitudeE6() / 1E6, 1);

After this we concatenate each value in the Addresses array list to get a single string with the complete location address.


for (int i=0; i<addresses.get(0).getMaxAddressLineIndex();i++)
 strCompleteAddress += addresses.get(0).getAddressLine(i) + "\n";

The last part displays a Toast that will show the string location name.


Toast.makeText(getBaseContext(), strCompleteAddress, Toast.LENGTH_LONG).show();

Geocoding snapshot showing the complete string location name that is touched on the map

Same is the case with Reverse Geocoding, if we have the string location name we can get the coordinates to that location by using Reverse Geocoding. The sample code for Reverse Geocoding is attached below.


Geocoder geoCoder = new Geocoder(this, Locale.getDefault());
 try {
 List<Address> addresses = geoCoder.getFromLocationName("Bhattai Rd Islamabad", 5);
 String strCompleteAddress = "";
 if (addresses.size() > 0) {
 p = new GeoPoint(
 (int) (addresses.get(0).getLatitude() * 1E6),
 (int) (addresses.get(0).getLongitude() * 1E6));
 mc.animateTo(p);
 mapView.invalidate();
 }
 } catch (IOException e) {
 e.printStackTrace();
 }

Blog Stats

  • 345,000 hits

Enter your email address to follow this blog and receive notifications of new posts by email.

Join 234 other subscribers