You are currently browsing the category archive for the ‘Android’ category.
Learning Android Canvas
I was away from my blog for a few months and the reason was this book. It was a challenging task and a lot different then writing my usual technical articles. On 10th Dec 2013 I received the first printed version of my book. I really don’t have words to explain my feeling when I opened the package and saw my name on the Title of the book.
For Details follow the link https://mirnauman.wordpress.com/my-first-book/
I believe that you have gone through the first part of this article. i.e,
Our First Android Google Maps API Ver 2.0 Application. Part # 1
In this part we will go through a detail explanation of getting the Api ver 2.0 key one baby step at a time. I ll try not to skip even the smallest step so that fresh developers finds it easy to make it to the finish line successfully. The main sections covered in this article are
- Signing the application and why its necessary.
- Retrieving our application’s certificate.
- Registering our project
- Our Api project creation.
- Obtaining the Api key
- Adding the Api key to our application
Signing the application and why its necessary.
The signing of the application is not something very complicated or suspicious thing. It is used to identify the author of a certain application. Their is no signing authority involved and it is allowed to use self signed certificates for android application. The private key is with the developer of the application. Without signing our application we will not be able to get the Android Google Maps API Ver 2.0 key. So we have to do it as any cost. We will skip a lot of boring theory about this signing application and will go through the important part but if the readers are interested in some more details they can always click on the link “Signing Application Details“. Signing can be in two modes. Signing in Debug mode and Signing in Release mode. In this article I ll only go through the Signing in Debug mode.
Signing in Debug mode
To sign our application in Debug mode first we will make sure that we have the “keytool” utility present at our JDK, JRE install location. The keytool is used to create the debug keystore and key automatically. The key is than used to sign the application automatically. The location of keytool on my system is “C:\Program Files\Java\jre7\bin\keytool.exe”. the debug.keystore is created with predetermined names and passwords. e.g,
- Keystore name: “debug.keystore”
- Keystore password: “android”
- Key alias: “androiddebugkey”
- Key password: “android”
- CN: “CN=Android Debug,O=Android,C=US”
Wc can change the location and name of the debug keystore but for now we will leave it as it is. One thing to make note of is that the self signed certificate of debug mode has a validity of 365 days, than it expires. Now to complete the process we have to retrieve our SHA-1 fingerprint and use it to sign our application and get the api key.
What is SHA-1 fingerprint , where and how to find it.
SHA-1 fingerprint is a unique text string generated by SHA-1 hash Algorithm and as it is unique , Google Maps uses it to identify the application. To find it there are two ways, first use keytool to generate the SHA-1 fingerprint through command prompt. The command is explained in detail in the link How to get Google Maps API Key but there is a simple way to find out SHA-1 fingerprint but before we get this fingerprint we need to understand that there are two type of certificates through which we can generate the SHA-1 fingerprint.
- The Debug Certificate
- The Release Certificate
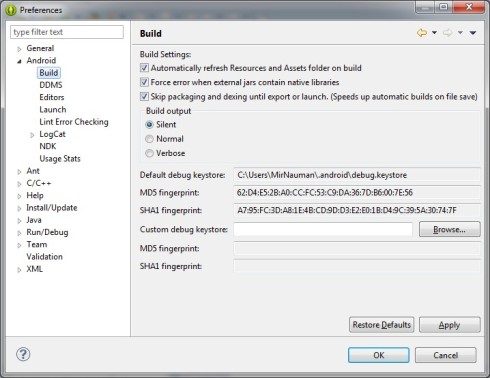
The Debug certificate is created automatically by the SDK tools when the application is built without exporting it as released application. This certificate can only be used for testing and not for publishing the application as released version. The Release certificate is generated by the SDK tools when a release built of the application is done. With this certificate you can the application can be published. For testing and development we will use the Debug certificate. To display the SHA-1 fingerprint on Debug certificate go to Windows menue in Eclipse and click Preferences, than select Android from the list and click Build. We will see the following screen.
This is the easiest way to display the SHA-1 fingerprint. Note down the SHA-1 fingerprint. Keytool commands from command prompt can also be used to display the same SHA-1 fingerprint. But i guess using Eclipse to display this is alot easier.
Registering our application
We will use our gmapv2 application that we have created in Part # 1 of this series for registration process. Open a browser and navigate to the following link. Google API Console.
You will be prompted for logging In, Log In with your gmail id and password. You will be taken to the following screen.
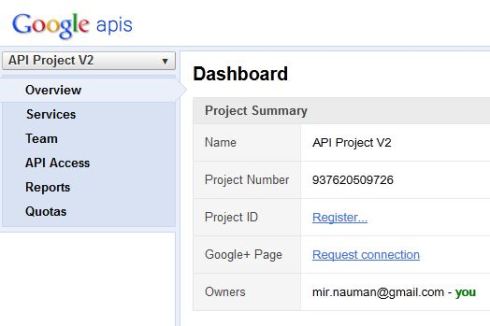
Expand the top Left Dropdown list Where it is written API Project V2 and click Create. A dialog box will appear where will give our new API Project Name, In the above snapshot I have named it API Project V2. Click the Create project button and you will taken the the following screen.
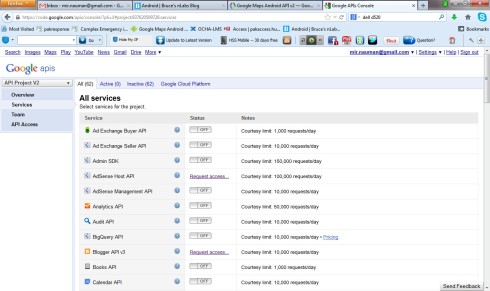
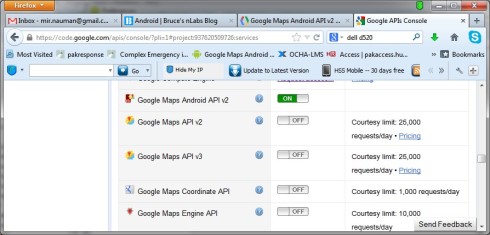
Scroll down in the services and find “Google Maps Android API V 2“. The button in front of it will be showing Off. Click it to turn the service on.
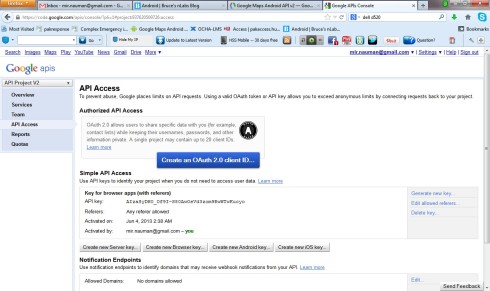
When we turn on the service we will be prompted for Terms of Service. Agree and and click Accept button to proceed. Almost at the finish line to get our API key. Get to the Google API Console. In the navigation bar to the left click API Access.
Obtaining The API Key
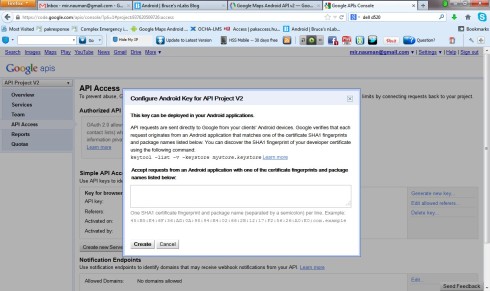
From the above screen click on “Create new Android key” button. This will bring us to the following screen.
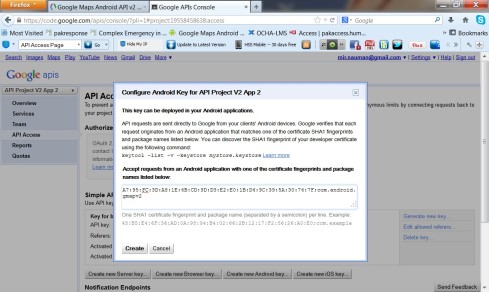
Copy your SHA-1 that we have previously displayed and noted down. Paste that in the empty text box and than enter a “;” semicolon at the end of the string and write your complete package name so the complete string becomes SHA-1 fingerprint+;+complete package name.
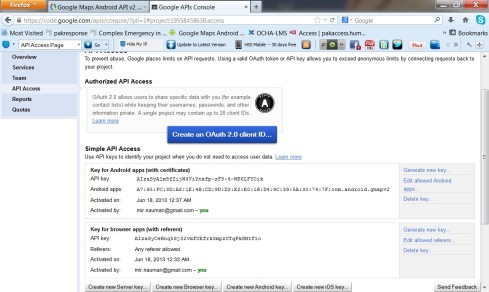
Click create and you will come to the previous screen with the following addition.
As you can see on the screen. Our API Key is listed and below that is the SHA-1+;+complete package name that will be some what like this.
A7:95:FC:3D:A8:1E:4B:CD:9D:D3:E2:E0:1B:D4:9C:39:5A:30:74:7F;com.android.gmapv2
The API Key will look like this.
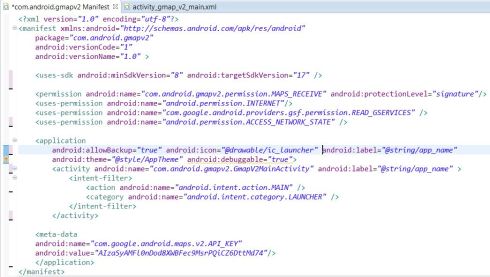
Adding the key to our gmapv2 application Open the gmapv2 application in Eclipse. Open the AndroidManifest.xml file and write the following code with your own API Key. Just above the application ending tag.
Now add the necessary permissions to AndroidManifest.xml file.
Setting up permissions in AndroidManifest.xml file for our first Android Google Maps API Ver 2.0 Application
Code of the complete AndroidManifest.xml file will look like this.
So far we are done with getting the API Key and putting it in our gmapv2 application. In the next part of this series we will go through all the steps of how to deploy or test this application on actual device. How actual device can be connected to Eclipse. What challenges we will face and what are the solutions for that.
Related articles
- Our First Android Google Maps API Ver 2.0 Application. Part # 1 (mirnauman.wordpress.com)
- How to get Google Maps API Key
Note : Source code for this article
https://docs.google.com/file/d/0B7W5NGdltb1jeXBvRDNqaV9maFk/edit?usp=sharing
Update 1.0 of this article at the bottom of the page.
Driving agent for this article
There was some stuff that my readers were eagerly waiting for. With the launch of Android Google Maps API Ver 2.0 everything that was in progress with API Ver 1.0 was a mess. The switching had given a hard time to alot of developers as the way even the sample app is successfully executed is way too complicated. I received tons of emails and requests for support specially for getting the Google Maps API Ver 2.0 key and the part where everything seems fine but map is not displayed. A couple of days back i started working on Google Maps API Ver 2.0. I solved the above two issues and alot more but didn’t posted anything because i was in the middle of successfully executing and displaying the Map. The aim was that I’ll start writing once am done with at lease one successful running application and today i have that running app. During this series of articles i ll take my readers from basic setup and configuration to a successful run of their first Android Google Maps API Ver 2.0 Application.
Before we start I need my readers to keep this in mind that they need a physical device to develop and test their API Ver 2.0 Application. I am using HTC One X as my physical device
What we have and what we need
I believe that we have Eclipse installed, JRE installed and in place as without JRE Eclipse won’t work and Android SDK downloaded and installed, if not Google has made it easy for us with a single download. Download the ADT Bundle for the following link http://developer.android.com/sdk/index.html . The ADT (Android Developer Tools) Includes Eclipse with ADT PlugIn, Android SDK Tools, Android Platform Tools and the latest Android Image for the emulator. You might need to download the JRE and install it to run the IDE. We need the following to get rolling.
- Physical Device ( I have an HTC One X)
- Google Play Services
- Android Support Library
- An API Ver 2.0 Key
- OEM USB Drivers (For windows, as am using Windows 7 Professional 64bit)
In part 1 we will only get all these bits and pieces together so that we can make it work in the later sections bit by bit and piece by piece. Lets say we have the Physical Device so we will move to the next thing in the list i.e, Google Play Services. But before we do that we need to start a new project with the name gmapv2 with Android 4.2.2 and Google API Lever 17. (I hope the reader has some background of basic android development.)
Installing Google Play Services
To get the Google Play Services Launch the SDK Manager from within Eclipse. Click Windows>Android SDK Manager. Scroll down the list and mark Google Play Services. Click the “Install Packages” button and wait till the installation is completed.
When the Installation is done, we will add to our project. The easiest way is Right Click on the project and click on Import>Android>Existing Android Code Into Workspace . Browse to the location of the library project.
The location of my library project is
F:\Android\adt-bundle-windows-x86_64-20130219\adt-bundle-windows-x86_64-20130219\sdk\extras\google\google_play_services\libproject\google-play-services_lib
We have to take care when doing this. we have to go to the google-play-services_lib inside libproject that is inside the google-play-services folder. When the import is done successful. Now we have to add a reference to our project.
Reference to Google Play Services
Right click on our project and click on Properties. From the list click on Android. Click Add, browse to the google-play-service_lib.
Now that we are done with Google Play Services, we will come to Google Support Library.
Android Support Library
To add the Google Support Library , right click on the project and click on Android tools. Than click on Add Support Library.
Accept the license agreement and install the support library.
Save your project and we are done with part 1st of this tutorial. In Part 2 we will learn step by step how we will get Google Maps API Ver 2.0 Key. Getting the API key is the most tricky part.
For Android Google Maps Ver 1.0 developers should click on the following link
Note : Source code for this article
https://docs.google.com/file/d/0B7W5NGdltb1jeXBvRDNqaV9maFk/edit?usp=sharing
Update 1.0 (30th JAN 2014):- Before it was not possible to test an Android Google Maps Api Ver 2.0 on Emulator but now its possible. I ll post both the articles soon . Testing the App on physical device and Testing the App on emulator.
There are tons of articles on the internet that demonstrates how to call a web service from android code. I ll try to keep it simple so that my reader don’t get confused as i was while reading others articles on the current topic. Object of this article is a simple application that takes text from an Android Activity, than calls a web service, pass the values to the web service, than the web service do what ever it likes to do with the received text and that’s it. When we are done with this scenario than we will make this application more complicated by receiving something from a web service as a response and do something inside our application.
I ll assume that we have a web service developed and deployed for this purpose. For this tutorial we will use the web service that i have previously developed which receives two numbers and returns their sum. https://mirnauman.wordpress.com/2012/08/08/creating-a-simple-dot-net-web-service/
Start with a simple application. Than download the latest KSoap2 jar files from the following address.
or you can search the KSoap2 library and download it from any other location. The thing to remember is that what ever is downloaded it should be ksoap2-android-something and not just ksoap2-something. When the jar file is downloaded. Add the jar file to the existing project. Steps are given below.
- Right click the project and click Properties.
- From the opened dialog click on Java Build Path
- Open the Libraries Tab
- Click on the Add External JARs button to the right.
- Select the ksoap2-android-something.jar file from the HDD and click ok.
This will add the library to the current application. now coming to some coding thingi. Add the following in the import section
import org.ksoap2.SoapEnvelope;
import org.ksoap2.serialization.PropertyInfo;
import org.ksoap2.serialization.SoapObject;
import org.ksoap2.serialization.SoapPrimitive;
import org.ksoap2.serialization.SoapSerializationEnvelope;
import org.ksoap2.transport.HttpTransportSE;
Add the following code to the start of our Main Activity code, outside the onCreate() method in the section where we define our global variables.
private final String SOAP_NAMESPACE = "http://tempuri.org/";
private final String SOAP_URL = "http://10.52.0.114:8082/Service1.asmx";

private final String SOAP_ACTION = "http://tempuri.org/add";

private final String SOAP_METHOD_NAME = "add";
 private SoapObject request;
 private PropertyInfo pi1;

private PropertyInfo pi2;
In the above section we have created variables with values providing the Namespace, the URL where our web service is hosted, the action consisting our WEB METHOD in our web service and the method name that will be called. Other than that we have created two objects of type SoapObject and PropertyInfo.
//webservice thingi start

request = new SoapObject(SOAP_NAMESPACE, SOAP_METHOD_NAME);

pi1 = new PropertyInfo();
 pi1.setName("a");
 pi1.setValue(etno1.getText().toString());//get the string that is to be sent to the web service
 pi1.setType(String.class);
request.addProperty(pi1);

pi2 = new PropertyInfo();
 pi2.setName("b");
 pi2.setValue(etno2.getText().toString());//get the string that is to be sent to the web service
 pi2.setType(String.class);
request.addProperty(pi2);

SoapSerializationEnvelope envp = new SoapSerializationEnvelope(SoapEnvelope.VER11);
 envp.dotNet = true;
 envp.setOutputSoapObject(request);
 HttpTransportSE androidHttpTransport = new HttpTransportSE(SOAP_URL);
 try {
 androidHttpTransport.call(SOAP_ACTION, envp);
response = (SoapPrimitive)envp.getResponse();
 } catch (Exception e) {
Log.i("WS Error->",e.toString());
 }
 //webservice thingi ends
In the above code we define a request object, than we define a Property Info object, set a name for it. Assign a value to it. Set its type and add that property to the already created request object. After that “androidHttpTransport.call(SOAP_ACTION, envp);” this is the actual statement that actually calls the web service and passes the values to it. If everything is fine, the program will execute smoothly else the program will crash here.
Issues that am unable to solve so far.
There are a number of possibilities that can cause the application to crash at this point. “response = (SoapPrimitive)envp.getResponse();” this will get the response from the web service if the web service is actually returning some value. So far am trying to tune this part. As the response is not giving me the desired returned value. Either it returns a zero, if i switch between SoapPrimitive and SoapObject than either the program crashes or returns the value the i pass first to the web service.
Note:- KSOAP2 might not be a good option if this return value issue is not solved but if we are working with a web service that only receives a value from our Android application and do something of its own like saving the received string in the database on some server, than KSOAP2 can be used as explained in the above tutorial.
Related articles
- Creating a simple dot net web service. (mirnauman.wordpress.com)
- Publishing a Dot Net Web Service or Website. (mirnauman.wordpress.com)
Preface:
One of readers asked me to write about getting the names of the location that I touch on the map if it is possible to get names from coordinates. That query triggered me to write this article. The answer is yes we can get location names if we have coordinates, the process is called Geocoding.
Geocoding is the process in which we translate latitude and longitude sets to text based address or string location names. Like if we have the coordinates 33695043,73050000 and we want to know which location is it. We will use geocoding and will find out that its Islamabad, the capital of Pakistan. Same is the case with Reverse Geocoding, if we have the name Islamabad, we can Reverse Geocode it to fine the coordinates. To continue with this article I have used the code from my last tutorial i.e, https://mirnauman.wordpress.com/2012/04/26/android-google-maps-tutorial-part-7-drawing-a-path-or-line-between-two-locations/ but u guys don’t need to use the code from that tutorial. You can use ur current google maps app and just insert the OnTouchEvent method the YourOverlay Class that extends Overlay Class
A lil boring theory:
We will use the Geocoder Class. This class is used for Geocoding and Reverse Geocoding. Now in Reverse Geocoding things can be a lil tricky coz the returned latitude, longitude values depend on the string address details that a user has provided. It may be just a city name, a city name with a street name or a city name with street name and name of a building or specific location. The Geocoder class requires a backend service that is not included in the core android framework. The Geocoder query methods will return an empty list if there no backend service in the platform. The major public methods of this class are getFromLocation() and getFromLocationName(). The earlier one will transform lat,long values to string location names and the later one will get the coordinates from string location names. both the methods will return an array of address i.e, List< Addresses >.
Enough theory, now some real stuff
Add the following code to the class that extends Overlay Class
@Override
 public boolean onTouchEvent(MotionEvent event, MapView mapView)
 {
 //---when user lifts his finger---
 if (event.getAction() == 1) {
 GeoPoint p = mapView.getProjection().fromPixels(
 (int) event.getX(),
 (int) event.getY());

 Toast.makeText(getBaseContext(),
 p.getLatitudeE6() / 1E6 + "," +
 p.getLongitudeE6() /1E6 ,
 Toast.LENGTH_SHORT).show();

 Geocoder geoCoder = new Geocoder(getBaseContext(), Locale.getDefault());
 try {
 List<Address> addresses = geoCoder.getFromLocation(p.getLatitudeE6() / 1E6, p.getLongitudeE6() / 1E6, 1);

 String strCompleteAddress= "";
 if (addresses.size() > 0)
 {
 for (int i=0; i<addresses.get(0).getMaxAddressLineIndex();i++)
strCompleteAddress+= addresses.get(0).getAddressLine(i) + "\n";
 }
 Log.i("MyLocTAG => ", strCompleteAddress);
 Toast.makeText(getBaseContext(), strCompleteAddress, Toast.LENGTH_LONG).show();
 }
 catch (IOException e) {
 Log.i("MyLocTAG => ", "this is the exception part");
 e.printStackTrace();
 }
 return true;
 }
 else
 return false;
 }
The first Toast will show only the latitude and longitude in number for the location that is touched. Then we created an object of the Geocoder class.
Geocoder geoCoder = new Geocoder(getBaseContext(), Locale.getDefault());
Than we called the getFromLocation method, provided it with the latitude and longitude values and the number of search results that will be returned.
List<Address> addresses = geoCoder.getFromLocation(p.getLatitudeE6() / 1E6, p.getLongitudeE6() / 1E6, 1);
After this we concatenate each value in the Addresses array list to get a single string with the complete location address.
for (int i=0; i<addresses.get(0).getMaxAddressLineIndex();i++)
 strCompleteAddress += addresses.get(0).getAddressLine(i) + "\n";
The last part displays a Toast that will show the string location name.
Toast.makeText(getBaseContext(), strCompleteAddress, Toast.LENGTH_LONG).show();
Same is the case with Reverse Geocoding, if we have the string location name we can get the coordinates to that location by using Reverse Geocoding. The sample code for Reverse Geocoding is attached below.
Geocoder geoCoder = new Geocoder(this, Locale.getDefault());
 try {
 List<Address> addresses = geoCoder.getFromLocationName("Bhattai Rd Islamabad", 5);
 String strCompleteAddress = "";
 if (addresses.size() > 0) {
 p = new GeoPoint(
 (int) (addresses.get(0).getLatitude() * 1E6),
 (int) (addresses.get(0).getLongitude() * 1E6));
 mc.animateTo(p);
 mapView.invalidate();
 }
 } catch (IOException e) {
 e.printStackTrace();
 }
Related articles
- Android Google Maps Tutorial Part 7, Drawing A Path or Line Between Two Locations (mirnauman.wordpress.com)
- Android Google Maps Tutorial Part 6, Getting The Location That Is Touched. (mirnauman.wordpress.com)
I have been trying this for a month and a lot of my readers asked to write a tutorial that makes it easy to draw a line on Google Maps for Android between two locations. I have gone through a lot of material. Most of the articles on this exact issue are not exactly addressing this specific issue. So their code is way too complex for this simple task. I have tried to make this as simple as possible.
Assumption About The Reader:
At this point I assume that reader of this article have already configured everything and Google Maps are displayed in their emulator properly. For those who don’t have Google Maps properly displayed in their emulator, they can read my earlier articles. Links provided at the end of this article.
Objective:
Draw a line that between two points on Google Maps lets say City “A” and City “B”. Repeat…
View original post 464 more words
To get going with this tutorial I am using the code from my previous tutorial https://mirnauman.wordpress.com/2012/04/10/android-google-maps-tutorial-part-5-adding-multiple-images-to-google-maps-using-itemizedoverlay/
Objective:-
To get the Latitude and Longitude values of a location that is touched on Google Maps in Android.
Solution:-
All we need is a simple function onTouchEvent(MotionEvent event, MapView mapView), that can be added to either a Class that extends Overlay or a Class that extends ItemizedOverlay. In my tutorial I have used ItemizedOverlay so I ll add the function to my class “MirItemizedOverlay” that extends ItemizedOverlay.
Function to be added:-
Now when we Run the Application and touch the sceen. As soon as we lift the touch, the application will display the Latitude and Longitude values in a Toast.
Complete code of tutorial Google Maps Part 5 will become
Related articles
View original post 38 more words
Dear readers am back after a long time trying to complete what i started a few months back. This article is part 5 of the previous series but it doesn’t depend on the code of the previous articles, still they can be referenced to get a better understanding of configuring Google Maps for Android and learning the basic development of Google Maps for Android. The development environment stays the same as of the previous articles. No change in any of the configurations etc.
Please see the links for previous articles for basics of Google Maps for Android.
- https://mirnauman.wordpress.com/2012/01/30/using-google-maps-in-android-development-tutorial-part-1/
- https://mirnauman.wordpress.com/2012/02/07/using-gps-in-android-and-animating-google-maps-to-the-current-gps-location-android-tutorial-part-2/
- https://mirnauman.wordpress.com/2012/02/13/adding-image-to-googlemaps-using-map-overlays-android-tutorial-part-3/
- https://mirnauman.wordpress.com/2012/02/14/android-google-maps-tutorial-part-4-adding-menu-some-additional-functionality-like-zooming-changing-map-view-animating-to-gps-current-location-using-menu-button/
Objective of this article is to add multiple images to our Google Map Application for Android. I have taken a scenario where I have a list of coordinates of different cities of Pakistan and I want display an image on each city. Check the final output of this article so that you have an idea of what we…
View original post 354 more words
To get going with this tutorial one needs to go through all the previous 3 parts because we are using the same code from the previous tutorials and taking it a few steps further.
- https://mirnauman.wordpress.com/2012/01/30/using-google-maps-in-android-development-tutorial-part-1/
- https://mirnauman.wordpress.com/2012/02/07/using-gps-in-android-and-animating-google-maps-to-the-current-gps-location-android-tutorial-part-2/
- https://mirnauman.wordpress.com/2012/02/13/adding-image-to-googlemaps-using-map-overlays-android-tutorial-part-3/
Our main emphasis in this tutorial will be on adding a Menu to our Android GoogleMaps project and perform different actions using the buttons of that menu. So wat we will do is to create a menu with 3 buttons. Just like the one shown in the image below.
- My Current Location Button
- Map Satellite View Button
- Map Normal View Button
Before we start we will copy 3 images(mylocation.png,satelliteview.png,normalview.png) in the drawables folder in the res folder. After this we will create a new xml file in the layout folder. We will name our file as “menu.xml”. The code for menu.xml is given below.
Save the menu.xml file and open GooglemapsActivity.java file. Now add the…
View original post 514 more words


